一 Spring的介绍
官网:
1.1 Spring 概述
Spring是一个分层的Java SE/EE应用一站式的轻量级开源框架,Spring核心是IOC和AOP。 Spring主要优点包括:
- 方便解耦,简化开发,通过Spring提供的IoC容器,我们可以将对象之间的依赖关系交由Spring进行控制,避免硬编码造成的程序耦合度高。
- AOP编程的支持,通过Spring提供的AOP功能,方便进行面向切面编程。
- 声明式事务的支持,在Spring中,我们可以从单调烦闷的事务管理代码中解脱出来,通过声明式方式灵活地进行事务的管理,提高开发效率和质量。
- 方便程序的测试,可以用非容器依赖的编程方式进行几乎所有的测试工作。
- 方便集成各种优秀框架,Spring提供了对各种优秀框架的直接支持。
1.2 架构
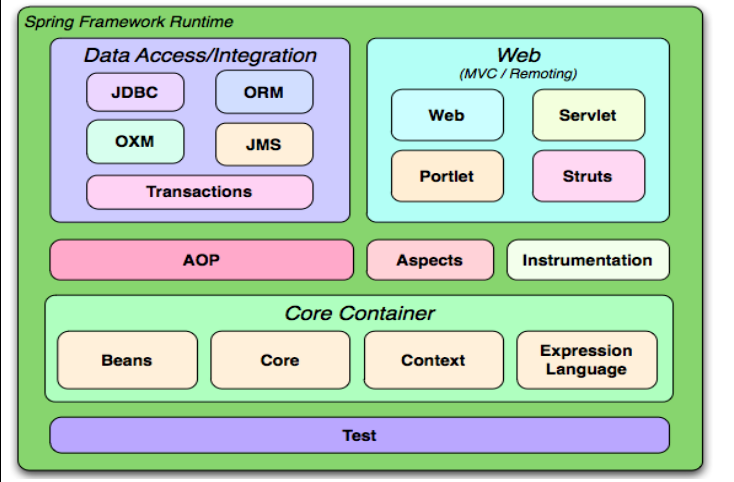
整个spring框架按其所属功能可以划分为五个主要模块,这五个模块几乎为企业应用提供了所需的一切,从持久层、业务层到表现层都拥有相应的支持,这就是为什么称Spring是一站式框架的原因。

🔷核心模块(Core Container)
- Spring的核心模块实现了IoC的功能,它将类和类之间的依赖从代码中脱离出来,用配置的方式进行依赖关系描述,由IoC容器负责类的创建,管理,获取等。BeanFactory接口是Spring框架的核心接口,实现了容器很多核心的功能。
- Context模块构建于核心模块之上,扩展了BeanFactory的功能,包括国际化,资源加载,邮件服务,任务调度等多项功能,ApplicationContext是Context模块的核心接口。
- 表达式语言(Expression Language)是统一表达式语言(EL)的一个扩展,支持设置和获取对象属性,调用对象方法,操作数组、集合等,使用它可以很方便的通过表达式和Spring IoC容器进行交互。
🔷AOP模块
- Spring AOP模块提供了满足AOP Alliance规范的实现,还整合了AspectJ这种AOP语言级的框架,通过AOP能降低耦合。
🔷数据访问集成模块(Data Access/Integration )
- 事务模块:该模块用于Spring管理事务,只要是Spring管理对象都能得到Spring管理事务的好处,无需在代码中进行事务控制了,而且支持编程和声明性的事务管理。
- JDBC模块:提供了一个JBDC的样例模板,使用这些模板能消除传统冗长的JDBC编码还有必须的事务控制,而且能享受到Spring管理事务的好处。
- ORM模块:提供与流行的“对象-关系”映射框架的无缝集成,包括hibernate、JPA、MyBatis等。而且可以使用Spring事务管理,无需额外控制事务。
- OXM模块:提供了一个对Object/XML映射实现,将Java对象映射成XML数据,或者将XML数据映射成java对象,Object/XML映射实现包括JAXB、Castor、XMLBeans和XStream。
- JMS模块:用于JMS(Java Messaging Service),提供一套“消息生产者、消息消费者”模板用于更加简单的使用JMS,JMS用于在两个应用程序之间,或分布式系统中发送消息,进行异步通信。
🔷Web模块
- 该模块建立在ApplicationContext模块之上,提供了Web应用的功能,如文件上传、FreeMarker等,Spring可以整合Struts2等MVC框架。此外,Spring自己提供了MVC框架Spring MVC。
🔷测试模块
- Spring可以用非容器依赖的编程方式进行几乎所有的测试工作,支持JUnit和TestNG等测试框架。
二 工厂设计模式
- 关于24中设计模式可以参考网站:https://refactoringguru.cn/design-patterns/singleton
- 请记住万物皆对象,无论是我们写的类还是啥,为啥这里这里先介绍工厂模式,因为Spring的核心就在于工厂产生的对象而构成了我们强大的Spring
2.1 简单工厂模式

工厂方法模式是一种创建型设计模式, 其在父类中提供一个创建对象的方法, 允许子类决定实例化对象的类型。
- 硬编码方式获取对象,缺点:代码强耦合,一方的改变影响其他的一方
import com.shu.service.UserServer;
import com.shu.service.UserServerImpl;
import org.junit.Test;
import org.springframework.context.ApplicationContext;
import org.springframework.context.support.ClassPathXmlApplicationContext;

/**
 * @description:
 * @author: shu
 * @createDate: 2023/7/20 23:38
 * @version: 1.0
 */
public class ApiTest {

    /**
     * 硬编码方式获取对象
     */
    @Test
    public void test1(){
        UserServer userServer = new UserServerImpl();
        userServer.getUser();
    }

}

- 简单工厂的实现,首先我们需要维护一个key-Value的关系,新建applicationContext.properties文件

实现我们的工厂,通过反射来获取我们的实现类
package com.shu.factory;

import com.shu.service.UserService;

import java.io.IOException;
import java.io.InputStream;
import java.util.Properties;

/**
 * @description: Bean工厂类,用于创建对象,解耦合,降低程序间的依赖关系,提高程序的可扩展性
 * @author: shu
 * @createDate: 2023/7/20 23:46
 * @version: 1.0
 */
public class BeanFactory {
    private static Properties env = new Properties();

    static{
        try {
            //第一步 获得IO输入流
            InputStream inputStream = BeanFactory.class.getResourceAsStream("/applicationContext.properties");
            //第二步 文件内容 封装 Properties集合中 key = userService
            env.load(inputStream);
            inputStream.close();
        } catch (IOException e) {
            e.printStackTrace();
        }
    }

    /**
     * 对象的创建方式:
     * @return
     */
    public static UserService getUserService() {
        UserService userService = null;
        try {
            Class clazz = Class.forName(env.getProperty("userService"));
            userService = (UserService) clazz.newInstance();
        } catch (ClassNotFoundException e) {
            e.printStackTrace();
        } catch (InstantiationException e) {
            e.printStackTrace();
        } catch (IllegalAccessException e) {
            e.printStackTrace();
        }
        return userService;

    }

}
- 测试
import com.shu.factory.BeanFactory;
import com.shu.service.UserService;
import com.shu.service.UserServerImpl;
import org.junit.Test;

/**
 * @description:
 * @author: shu
 * @createDate: 2023/7/20 23:38
 * @version: 1.0
 */
public class ApiTest {

    /**
     * 硬编码方式获取对象
     */
    @Test
    public void test1(){
        UserService userServer = new UserServerImpl();
        userServer.getUser();
    }

    /**
     * 通过工厂类获取对象
     */
    @Test
    public void test2(){
        UserService userService = BeanFactory.getUserService();
        userService.getUser();
    }

}

上面的这种方式存在一个缺点,耦合度还是很高,这里我们采用Key-Value来寻找他的实现类,下面采用通用工厂来实现
package com.shu.factory;

import com.shu.service.UserService;

import java.io.IOException;
import java.io.InputStream;
import java.util.Properties;

/**
 * @description: Bean工厂类,用于创建对象,解耦合,降低程序间的依赖关系,提高程序的可扩展性
 * @author: shu
 * @createDate: 2023/7/20 23:46
 * @version: 1.0
 */
public class BeanFactory {
    private static Properties env = new Properties();

    static{
        try {
            //第一步 获得IO输入流
            InputStream inputStream = BeanFactory.class.getResourceAsStream("/applicationContext.properties");
            //第二步 文件内容 封装 Properties集合中 key = userService
            env.load(inputStream);
            inputStream.close();
        } catch (IOException e) {
            e.printStackTrace();
        }
    }

    /**
     * 对象的创建方式:
     * @return
     */
    public static UserService getUserService() {
        UserService userService = null;
        try {
            Class clazz = Class.forName(env.getProperty("userService"));
            userService = (UserService) clazz.newInstance();
        } catch (ClassNotFoundException e) {
            e.printStackTrace();
        } catch (InstantiationException e) {
            e.printStackTrace();
        } catch (IllegalAccessException e) {
            e.printStackTrace();
        }
        return userService;
    }


    /**
     * 通过key获取对象
     * @param key
     * @return
     */
    public static Object getBean(String key){
        Object ret = null;
        try {
            Class clazz = Class.forName(env.getProperty(key));
            ret = clazz.newInstance();
        } catch (Exception e) {
            e.printStackTrace();
        }
        return ret;
    }

}
import com.shu.factory.BeanFactory;
import com.shu.service.UserService;
import com.shu.service.UserServerImpl;
import org.junit.Test;

/**
 * @description:
 * @author: shu
 * @createDate: 2023/7/20 23:38
 * @version: 1.0
 */
public class ApiTest {

    /**
     * 硬编码方式获取对象
     */
    @Test
    public void test1(){
        UserService userServer = new UserServerImpl();
        userServer.getUser();
    }

    /**
     * 通过工厂类获取对象
     */
    @Test
    public void test2(){
        UserService userService = BeanFactory.getUserService();
        userService.getUser();
    }

    /**
     * 通过工厂类获取对象
     */
    @Test
    public void test3(){
        UserService userService = (UserService) BeanFactory.getBean("userService");
        userService.getUser();
    }

}
这里我们不会多深究,主要是体会一下工厂模式的作用,为学习Spring打下基础
三 Spring的第一个程序
3.1 配置文件
- 依赖
        <dependency>
            <groupId>junit</groupId>
            <artifactId>junit</artifactId>
            <version>4.11</version>
            <scope>test</scope>
        </dependency>

        <!-- https://mvnrepository.com/artifact/org.springframework/spring-context -->
        <dependency>
            <groupId>org.springframework</groupId>
            <artifactId>spring-context</artifactId>
            <version>5.1.4.RELEASE</version>
        </dependency>
- 配置文件

这里我们介绍一下XML文件的验证模式
DTD
DTD(Document Type Definition)即文档类型定义,是一种XML约束模式语言,是XML文件的验证机制,属于XML文件组成的一部分。DTD是一种保证XML文档格式正确的有效方法,可以通过比较XML文档和DTD文件来看文档是否符合规范,元素和标签使用是否正确。一个DTD文档包含:元素的定义规则,元素间关系的定义规则,元素可使用的属性,可使用的实体或符号规则。
<?xml version="1.0" encoding="UTF-8"?>
<!DOCTYPE beans PUBLIC "-//Spring//DTD BEAN 2.0//EN" "http://www.Springframework. org/dtd/
Spring-beans-2.0.dtd">
<beans>
  ... ...
</beans>
而以Spring为例,具体的Spring-beans-2.0.dtd部分如下:
<!ELEMENT beans (
description?,
(import | alias | bean)*
)>
<!ATTLIST beans default-lazy-init (true | false) "false">
<!ATTLIST beans default-merge (true | false) "false">
<!ATTLIST beans default-autowire (no | byName | byType | constructor | autodetect) "no">
<!ATTLIST beans default-dependency-check (none | objects | simple | all) "none">
<!ATTLIST beans default-init-method CDATA #IMPLIED>
<!ATTLIST beans default-destroy-method CDATA #IMPLIED>
... ...
XSD
- XML Schema语言就是XSD(XML Schemas Definition),XML Schema描述了XML文档的结构,可以用一个指定的XML Schema来验证某个XML文档,以检查该XML文档是否符合其要求,文档设计者可以通过XML Schema指定一个XML文档所允许的结构和内容,并可据此检查一个XML文档是否是有效的,XML Schema本身是一个XML文档,它符合XML语法结构。可以用通用的XML解析器解析它。
- 在使用XML Schema文档对XML实例文档进行检验,除了要声明名称空间外(xmlns=http://www.Springframework.org/schema/beans),还必须指定该名称空间所对应的XML Schema文档的存储位置。
- 通过schemaLocation属性来指定名称空间所对应的XML Schema文档的存储位置,它包含两个部分,一部分是名称空间的URI,另一部分就是该名称空间所标识的XML Schema文件位置或URL地址(xsi:schemaLocation="http://www.Springframework.org/schema/beans http://www. Springframework.org/schema/beans/Spring-beans.xsd)
        <?xml version="1.0" encoding="UTF-8" standalone="no"?>
        <xsd:schema xmlns="http://www.Springframework.org/schema/beans"
                xmlns:xsd="http://www.w3.org/2001/XMLSchema"
                targetNamespace="http://www.Springframework.org/schema/beans">
            <xsd:import namespace="http://www.w3.org/XML/1998/namespace"/>
            <xsd:annotation>
                <xsd:documentation><![CDATA[
            ... ...
                ]]></xsd:documentation>
            </xsd:annotation>
            <!-- base types -->
            <xsd:complexType name="identifiedType" abstract="true">
                <xsd:annotation>
                      <xsd:documentation><![CDATA[
            The unique identifier for a bean. The scope of the identifier
            is the enclosing bean factory.
                      ]]></xsd:documentation>
                </xsd:annotation>
                <xsd:attribute name="id" type="xsd:ID">
                      <xsd:annotation>
                          <xsd:documentation><![CDATA[
            The unique identifier for a bean.
                            ]]></xsd:documentation>
                      </xsd:annotation>
                </xsd:attribute>
            </xsd:complexType>
            ... ...
        </xsd:schema>
总结:
DTD和XSD都是XML文档的验证机制,用于定义XML文档的结构和内容约束,但它们之间有几个重要的区别:
- 语法:DTD使用一种比较简单的语法,而XSD使用XML语法。由于XSD使用XML语法,因此它更加灵活和可扩展,可以定义更复杂的数据类型和结构。
- 功能:XSD提供比DTD更多的功能,例如:命名空间、数据类型、限制、继承等。这使得XSD更加适合处理大型、复杂的XML文档。
- 可读性:由于XSD使用XML语法,因此相对于DTD来说,XSD更容易阅读和理解。XSD还提供了更好的文档化支持,可以通过注释等方式对XSD进行说明。
- 兼容性:DTD比XSD更容易在不同的XML解析器之间进行兼容,因为DTD是在XML标准制定之前就被广泛使用的。但是,XSD相对于DTD提供更好的数据类型支持和扩展性,这使得它更加适合处理复杂的XML文档。
3.2 编码实现
- 首先在配置文件中配置我们的实例,在Spring中也成为组件或者叫做Bean
<?xml version="1.0" encoding="UTF-8"?>
<beans xmlns="http://www.springframework.org/schema/beans"
       xmlns:xsi="http://www.w3.org/2001/XMLSchema-instance"
       xsi:schemaLocation="http://www.springframework.org/schema/beans http://www.springframework.org/schema/beans/spring-beans.xsd">

    <!-- 1. 创建对象 -->
    <bean id="userService" class="com.shu.service.UserServerImpl"/>

</beans>
- 编码测试
    /**
     * 通过Spring工厂类获取对象
     */
    @Test
    public void test4(){
        ApplicationContext context = new    ClassPathXmlApplicationContext("applicationContext.xml");
        UserService userService = (UserService) context.getBean("userService");
        userService.getUser();
    }

我们可以看到他和我们上面自己写的工厂模式效果是一模一样的,但是不要以为他的底层就十分简单,实际上这几句代码就提现出来Spring的核心功能,后面我们学习Spring源码是来分析
3.3 ApplicationContext API介绍
    /**
     * Spring工厂方法测试
     */
    @Test
    public void test5(){
        ApplicationContext context = new ClassPathXmlApplicationContext("applicationContext.xml");
        // getBean()方法: 通过id获取对象, 但是这个id是在配置文件中配置的id
        UserService userService = (UserService) context.getBean("userService");
        userService.getUser();
        //获取的是 Spring工厂配置文件中所有bean标签的id值  person person1
        String[] definitionNames = context.getBeanDefinitionNames();
        for (String definitionName : definitionNames) {
            System.out.println("definitionName = " + definitionName);
        }
        //根据类型获得Spring配置文件中对应的id值
        String[] beanNamesForType = context.getBeanNamesForType(UserService.class);
        for (String id : beanNamesForType) {
            System.out.println("id = " + id);
        }

        //用于判断是否存在指定id值得bean,不能判断name值
        if (context.containsBeanDefinition("userService")) {
            System.out.println("true = " + true);
        }else{
            System.out.println("false = " + false);
        }

        //用于判断是否存在指定id值得bean,也可以判断name值
        if (context.containsBean("p")) {
            System.out.println("true = " + true);
        }else{
            System.out.println("false = " + false);
        }
        // 用于判断是否是单例模式
        boolean userService1 = context.isSingleton("userService");
        System.out.println("userService = " + userService1);
        // 用于判断是否是原型模式
        boolean userService2 = context.isPrototype("userService");
        System.out.println("userService = " + userService2);


    }

四 从Bean开始学习Spring

上面我们完成了一个简单的案例,下面我们来看一下Spring配置文件的属性
参考网站:https://springdoc.cn/spring/core.html#beans-definition
一个Spring 管理着一个或多个Bean。这些Bean是用你提供给容器的配置元数据创建的(例如,以XML <bean/> 定义的形式)。
在容器本身中,这些Bean定义被表示为 BeanDefinition 对象,它包含(除其他信息外)以下元数据。
- 一个全路径类名:通常,被定义的Bean的实际实现类。
- Bean的行为配置元素,它说明了Bean在容器中的行为方式(scope、生命周期回调,等等)。
- 对其他Bean的引用,这些Bean需要做它的工作。这些引用也被称为合作者或依赖。
- 要在新创建的对象中设置的其他配置设置—例如,pool的大小限制或在管理连接池的Bean中使用的连接数。
这个元数据转化为构成每个Bean定义的一组属性。下表描述了这些属性。
| 属性 | 解释… |
|---|---|
| Class | 实例化 Bean |
| Name | Bean 命名 |
| Scope | Bean Scope |
| Constructor arguments | 依赖注入 |
| Properties | 依赖注入 |
| Autowiring mode | 注入协作者(Autowiring Collaborators) |
| Lazy initialization mode | 懒加载的Bean |
| Initialization method | 初始化回调 |
| Destruction method | 销毁回调 |
除了包含如何创建特定 Bean 的信息的 Bean 定义外,ApplicationContext 实现还允许注册在容器外(由用户)创建的现有对象。
这是通过 getBeanFactory() 方法访问 ApplicationContext 的 BeanFactory 来实现的,该方法返回 DefaultListableBeanFactory 实现。DefaultListableBeanFactory 通过 registerSingleton(..) 和 registerBeanDefinition(..) 方法支持这种注册。
4.1 Bean 命名
每个Bean都有一个或多个标识符(identifier)。这些标识符在承载Bean的容器中必须是唯一的。
一个Bean通常只有一个标识符。然而,如果它需要一个以上的标识符,多余的标识符可以被视为别名。
在基于XML的配置元数据中,你可以使用 id 属性、name 属性或两者来指定Bean标识符。
id 属性允许你精确地指定一个 id。传统上,这些名字是字母数字('myBean'、'someService’等),但它们也可以包含特殊字符。如果你想为Bean引入其他别名,
你也可以在 name 属性中指定它们,用逗号(,)、分号(;)或空格分隔。尽管 id 属性被定义为 xsd:string 类型,但 bean id 的唯一性是由容器强制执行的,尽管不是由 XML 解析器执行。
如果你不明确地提供 name 或 id,容器将为该 Bean 生成一个唯一的名称。然而,如果你想通过使用 ref 元素或服务定位器风格的查找来引用该 bean 的名称,你必须提供一个名称。
Bean的命名规则
惯例是在命名Bean时使用标准的Java惯例来命名实例字段名。也就是说,Bean的名字以小写字母开始,然后以驼峰字母开头。这种名称的例子包括 accountManager、accountService、userDao、loginController 等等。
统一命名Bean使你的配置更容易阅读和理解。
Alias创建别名
例如,子系统A的配置元数据可以引用一个名为 subsystemA-dataSource 的数据源。子系统B的配置元数据可以引用一个名为 subsystemB-dataSource 的数据源。当组成使用这两个子系统的主应用程序时,主应用程序以 myApp-dataSource 的名字来引用数据源。为了让这三个名字都指代同一个对象,你可以在配置元数据中添加以下别名定义。
<alias name="myApp-dataSource" alias="subsystemA-dataSource"/>
<alias name="myApp-dataSource" alias="subsystemB-dataSource"/>
现在,每个组件和主应用程序都可以通过一个独特的名称来引用dataSource,并保证不与任何其他定义冲突(有效地创建了一个命名空间),但它们引用的是同一个bean。
Java注解配置
正如在 Bean 命名 中所讨论的,有时最好给一个Bean起多个名字,也就是所谓的Bean别名。@Bean 注解的 name 属性接受一个 String 数组来实现这一目的。下面的例子展示了如何为一个Bean设置若干别名。
@Configuration
public class AppConfig {

    @Bean({"dataSource", "subsystemA-dataSource", "subsystemB-dataSource"})
    public DataSource dataSource() {
        // instantiate, configure and return DataSource bean...
    }
}
代码演示
<?xml version="1.0" encoding="UTF-8"?>
<beans xmlns="http://www.springframework.org/schema/beans"
       xmlns:xsi="http://www.w3.org/2001/XMLSchema-instance"
       xsi:schemaLocation="http://www.springframework.org/schema/beans http://www.springframework.org/schema/beans/spring-beans.xsd">
    <alias name="userService" alias="userServer"/>
    <alias name="userServer" alias="userServer2"/>
    <!-- 1. 创建对象  -->
    <bean id="userService" class="com.shu.service.UserServerImpl"/>
    <bean name="userService2" class="com.shu.service.UserServerImpl"/>
</beans>

注意观察我们的别名设置,和我们在Spring配置文件定义的别名配置是否一样
4.2 实例化Bean
bean 定义(definition)本质上是创建一个或多个对象的配置。容器在被要求时查看命名的Bean的配置,并使用该Bean定义所封装的配置元数据来创建(或获取)一个实际的对象。
- 通常,在容器本身通过反射式地调用构造函数直接创建Bean的情况下,指定要构造的Bean类,有点相当于Java代码中的
new操作符。 - 在不太常见的情况下,即容器在一个类上调用
static工厂方法来创建 bean 时,要指定包含被调用的static工厂方法的实际类。从static工厂方法的调用中返回的对象类型可能是同一个类或完全是另一个类。
4.2.1 构造函数实例化
当你用构造函数的方法创建一个Bean时,所有普通的类都可以被Spring使用并与之兼容。也就是说,被开发的类不需要实现任何特定的接口,也不需要以特定的方式进行编码。只需指定Bean类就足够了。然而,根据你对该特定Bean使用的IoC类型,你可能需要一个默认(空)构造函数。
无参构造
对象
package com.shu.pojo;

/**
 * @description:
 * @author: shu
 * @createDate: 2023/7/20 23:34
 * @version: 1.0
 */
public class User {
    private String name;

    public User() {
        System.out.println("User的无参构造");
    }

    public User(String name) {
        this.name = name;
        System.out.println("User的有参构造");
    }

    public String getName() {
        return name;
    }

    public void setName(String name) {
        this.name = name;
        System.out.println("User的setName方法");
    }

    public void show() {
        System.out.println("name=" + name);
    }
}
配置文件
    <!-- 无参构造   -->
    <bean id="user" class="com.shu.pojo.User"/>
测试
    /**
     * 构造函数实例化bean
     */
    @Test
    public void test6(){
        ApplicationContext context = new ClassPathXmlApplicationContext("applicationContext.xml");
        User user = (User) context.getBean("user");
        user.show();
    }

有参构造
介绍有参构造之前我们需要了解依赖注入的概念?
依赖注入(DI)是一个过程,对象仅通过构造参数、工厂方法的参数或在对象实例被构造或从工厂方法返回后在其上设置的属性来定义它们的依赖(即与它们一起工作的其它对象)。然后,容器在创建 bean 时注入这些依赖。这个过程从根本上说是Bean本身通过使用类的直接构造或服务定位模式来控制其依赖的实例化或位置的逆过程(因此被称为控制反转)。
采用DI原则,代码会更干净,当对象被提供其依赖时,解耦会更有效。对象不会查找其依赖,也不知道依赖的位置或类别。因此,你的类变得更容易测试,特别是当依赖是在接口或抽象基类上时,这允许在单元测试中使用stub或mock实现。
DI有两个主要的变体。 基于构造器的依赖注入 和 基于setter的依赖注入。
构造器依赖注入
基于构造函数的 DI 是通过容器调用带有许多参数的构造函数来完成的,每个参数代表一个依赖。
    <!-- 有参构造   -->
    <bean id="user2" class="com.shu.pojo.User">
        <constructor-arg name="name" value="shu"/>
    </bean>
package com.shu.pojo;

/**
 * @description:
 * @author: shu
 * @createDate: 2023/7/20 23:34
 * @version: 1.0
 */
public class User {
    private String name;

    public User() {
        System.out.println("User的无参构造");
    }

    public User(String name) {
        this.name = name;
        System.out.println("User的有参构造");
    }

    public String getName() {
        return name;
    }

    public void setName(String name) {
        this.name = name;
        System.out.println("User的setName方法");
    }

    public void show() {
        System.out.println("name=" + name);
    }
}

观察结果我们可以发现在我们的Spring配置文件中完成了属性的注入,当然我们也可以通过参数的类型进行匹配,就如下面的一个案例,根据构造函数的参数类型进行匹配,然后进行赋值,当然官方还提供了一种索引匹配 和构造函数名称进行匹配
    <bean id="user" class="com.shu.pojo.User">
        <constructor-arg type="java.lang.String" value="shu"/>
        <constructor-arg type="int" value="18"/>
    </bean>
package com.shu.pojo;

/**
 * @description:
 * @author: shu
 * @createDate: 2023/7/20 23:34
 * @version: 1.0
 */
public class User {
    private String name;
    public int age;


    public User(String name, int age) {
        this.name = name;
        this.age = age;
        System.out.println("User的有参构造");
    }

    public User() {
        System.out.println("User的无参构造");
    }

    public User(String name) {
        this.name = name;
        System.out.println("User的有参构造");
    }

    public String getName() {
        return name;
    }

    public void setName(String name) {
        this.name = name;
        System.out.println("User的setName方法");
    }

    public void show() {
        System.out.println("name=" + name);
    }

    public void show2() {
        System.out.println("name=" + name);
        System.out.println("age=" + age);
    }
}

Setter的依赖注入
基于 Setter 的 DI 是通过容器在调用无参数的构造函数或无参数的 static 工厂方法来实例化你的 bean 之后调用 Setter 方法来实现的。简单来说就是调用了你的set发放,完成赋值,这也决定我们需要编写Set方法的实现,当然这也是我们Spring中常用的实例化
    <bean id="user" class="com.shu.pojo.User">
        <property name="name" value="shu"/>
    </bean>

复杂的情况,一个对象的初始化依赖其他类
    <bean id="user" class="com.shu.pojo.User">
        <property name="name" value="shu"/>
    </bean>

    <bean id="userService2" class="com.shu.service.UserServerImpl">
        <property name="user" ref="user"/>
    </bean>
    /**
     * set方法实例化bean
     */
    @Test
    public void test7(){
        ApplicationContext context = new ClassPathXmlApplicationContext("applicationContext.xml");
        UserServerImpl service2 =(UserServerImpl) context.getBean("userService2");
        service2.getUser();

    }

基于构造器的DI还是基于setter的DI?
由于你可以混合使用基于构造函数的DI和基于setter的DI,一个好的经验法则是对强制依赖使用构造函数,对可选依赖使用setter方法或配置方法。请注意,在setter方法上使用 @Autowired 注解可以使属性成为必须的依赖;然而,带有参数程序化验证的构造器注入是更好的。
Spring团队通常提倡构造函数注入,因为它可以让你将应用组件实现为不可变的对象,并确保所需的依赖不为
null。此外,构造函数注入的组件总是以完全初始化的状态返回给客户端(调用)代码。顺便提一下,大量的构造函数参数是一种不好的代码气味,意味着该类可能有太多的责任,应该重构以更好地解决适当的分离问题。Setter注入主要应该只用于在类中可以分配合理默认值的可选依赖。否则,必须在代码使用依赖的所有地方进行非null值检查。Setter注入的一个好处是,Setter方法使该类的对象可以在以后重新配置或重新注入。因此,通过 JMX MBean 进行管理是setter注入的一个引人注目的用例。
对于一个特定的类,使用最合理的DI风格。有时,在处理你没有源代码的第三方类时,你会做出选择。例如,如果一个第三方类没有暴露任何setter方法,那么构造函数注入可能是唯一可用的DI形式。
4.2.2 静态工厂方法进行实例化
在定义一个用静态工厂方法创建的Bean时,使用 class 属性来指定包含 static 工厂方法的类,并使用名为 factory-method 的属性来指定工厂方法本身的名称。你应该能够调用这个方法(有可选的参数,如后文所述)并返回一个活的对象,随后该对象被视为通过构造函数创建的。
package com.shu.factory;

import java.sql.Connection;
import java.sql.DriverManager;
import java.sql.SQLException;

/**
 * @description: 静态工厂, 用于书写创建复杂对象的代码
 * @author: shu
 * @createDate: 2023/7/21 20:14
 * @version: 1.0
 */
public class StaticConnectionFactory {

    public static Connection getConnection(){
        Connection conn = null;
        try {
            Class.forName("com.mysql.jdbc.Driver");
            conn = DriverManager.getConnection("jdbc:mysql://localhost:3306/auth?useSSL=false", "root", "123456");
        } catch (ClassNotFoundException e) {
            e.printStackTrace();
        } catch (SQLException e) {
            e.printStackTrace();
        }
        return conn;
    }
}
<bean id="db" class="com.shu.factory.StaticConnectionFactory" factory-method="getConnection"/>
    /**
     * 静态工厂实例化bean
     */
    @Test
    public void test8(){
        ApplicationContext context = new ClassPathXmlApplicationContext("applicationContext.xml");
        Object db = context.getBean("db");
        System.out.println("db = " + db);

    }

可以发现我们的把数据的信息都放在代码中的,如果我们把要把配置信息放在配置文件中该咋写呢?
package com.shu.factory;

import org.springframework.beans.factory.FactoryBean;

import java.sql.Connection;
import java.sql.DriverManager;

/**
 * @description:
 * @author: shu
 * @createDate: 2023/7/21 20:33
 * @version: 1.0
 */
public class ConnectionFactoryBean implements FactoryBean<Connection> {
    private String driverClassName;
    private String url;
    private String username;
    private String password;

    public String getDriverClassName() {
        return driverClassName;
    }

    public void setDriverClassName(String driverClassName) {
        this.driverClassName = driverClassName;
    }

    public String getUrl() {
        return url;
    }

    public void setUrl(String url) {
        this.url = url;
    }

    public String getUsername() {
        return username;
    }

    public void setUsername(String username) {
        this.username = username;
    }

    public String getPassword() {
        return password;
    }

    public void setPassword(String password) {
        this.password = password;
    }

    //用于书写创建复杂对象的代码
    @Override
    public Connection getObject() throws Exception {
        Class.forName(driverClassName);
        Connection conn = DriverManager.getConnection(url, username, password);
        return conn;
    }

    @Override
    public Class<?> getObjectType() {
        return Connection.class;
    }

    @Override
    public boolean isSingleton() {
        return false;
    }


    public void close(Connection conn){
        if(conn != null){
            try {
                conn.close();
            } catch (Exception e) {
                e.printStackTrace();
            }
        }
    }
}
<bean id="db2" class="com.shu.factory.ConnectionFactoryBean" >
<property name="url" value="jdbc:mysql://localhost:3306/mybatis?useUnicode=true&characterEncoding=utf8&serverTimezone=UTC"/>
<property name="driverClassName" value="com.mysql.jdbc.Driver"/>
<property name="username" value="root"/>
<property name="password" value="123456"/>
</bean>
    @Test
    public void test9() throws Exception {
        ApplicationContext context = new ClassPathXmlApplicationContext("applicationContext.xml");
        Connection db2 =(Connection) context.getBean("db2");
        System.out.println("db2 = " + db2);

    }

4.2.3 实例工厂方法进行实例化
与 通过静态工厂方法进行的实例化 类似,用实例工厂方法进行的实例化从容器中调用现有 bean 的非静态方法来创建一个新的 bean。要使用这种机制,请将 class 属性留空,并在 factory-bean 属性中指定当前(或父代或祖代)容器中的一个 Bean 的名称,该容器包含要被调用来创建对象的实例方法。用 factory-method 属性设置工厂方法本身的名称。
package com.shu.factory;

import java.sql.Connection;
import java.sql.DriverManager;
import java.sql.SQLException;

public class ConnectionFactory {

    public Connection getConnection(){
        Connection conn = null;
        try {
            Class.forName("com.mysql.jdbc.Driver");
            conn = DriverManager.getConnection("jdbc:mysql://localhost:3306/auth?useSSL=false", "root", "123456");
        } catch (ClassNotFoundException e) {
            e.printStackTrace();
        } catch (SQLException e) {
            e.printStackTrace();
        }
        return conn;
    }
}
    <bean id="connFactory" class="com.shu.factory.ConnectionFactory"></bean>
    <bean id="conn"  factory-bean="connFactory" factory-method="getConnection"/>
  @Test
    public void test10() throws Exception {
        ApplicationContext context = new ClassPathXmlApplicationContext("applicationContext.xml");
        Object conn = context.getBean("conn");
        System.out.println("conn = " + conn);

    }

4.2.4 确定Bean的运行时类型
要确定一个特定Bean的运行时类型是不容易的。在Bean元数据定义中指定的类只是一个初始的类引用,可能与已声明的工厂方法相结合,或者是一个 FactoryBean 类,这可能导致Bean的运行时类型不同,或者在实例级工厂方法的情况下根本没有被设置(而是通过指定的 factory-bean 名称来解决)。此外,AOP代理可能会用基于接口的代理来包装Bean实例,对目标Bean的实际类型(只是其实现的接口)的暴露有限。
要了解某个特定Bean的实际运行时类型,推荐的方法是对指定的Bean名称进行 BeanFactory.getType 调用。这将考虑到上述所有情况,并返回 BeanFactory.getBean 调用将为同一Bean名称返回的对象类型。
4.3 Bean Scope
当你创建一个Bean定义时,你创建了一个Bean,用于创建该Bean定义(definition)是所定义的类的实际实例。Bean定义(definition)是一个Bean的想法很重要,因为它意味着,就像一个类一样,你可以从一个Bean中创建许多对象实例。
你不仅可以控制各种依赖和配置值,将其插入到从特定Bean定义创建的对象中,还可以控制从特定Bean定义创建的对象的scope。这种方法是强大而灵活的,因为你可以通过配置来选择你所创建的对象的scope,而不是在Java类级别上烘托出一个对象的scope。Bean可以被定义为部署在若干scope中的一个。
| Scope | 说明 |
|---|---|
| singleton | (默认情况下)为每个Spring IoC容器将单个Bean定义的Scope扩大到单个对象实例。 |
| prototype | 将单个Bean定义的Scope扩大到任何数量的对象实例。 |
| request | 将单个Bean定义的Scope扩大到单个HTTP请求的生命周期。也就是说,每个HTTP请求都有自己的Bean实例,该实例是在单个Bean定义的基础上创建的。只在Web感知的Spring ApplicationContext 的上下文中有效。 |
| session | 将单个Bean定义的Scope扩大到一个HTTP Session 的生命周期。只在Web感知的Spring ApplicationContext 的上下文中有效。 |
| application | 将单个Bean定义的 Scope 扩大到 ServletContext 的生命周期中。只在Web感知的Spring ApplicationContext 的上下文中有效。 |
| websocket | 将单个Bean定义的 Scope 扩大到 WebSocket 的生命周期。仅在具有Web感知的 Spring ApplicationContext 的上下文中有效。 |
4.3.1 Singleton 单例
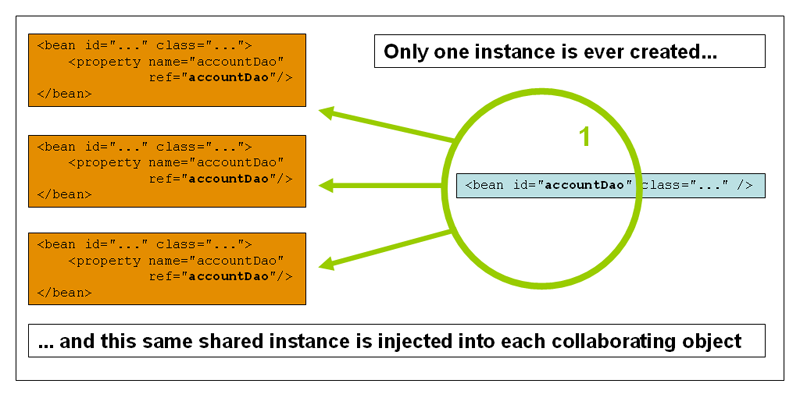
只有一个单例 Bean 的共享实例被管理,所有对具有符合该Bean定义的ID的Bean的请求都会被Spring容器返回该特定的Bean实例。
换句话说,当你定义了一个Bean定义(define),并且它被定义为 singleton,Spring IoC容器就会为该Bean定义的对象创建一个确切的实例。这个单一的实例被存储在这种单体Bean的缓存中,所有后续的请求和对该命名Bean的引用都会返回缓存的对象。下面的图片显示了 singleton scope 是如何工作的,singleton scope 是Spring的默认 scope

    /**
     * 构造函数实例化bean
     */
    @Test
    public void test6(){
        ApplicationContext context = new ClassPathXmlApplicationContext("applicationContext.xml");
        User user = (User) context.getBean("user");
        user.show2();
        // 用于判断是否是单例模式
        boolean user1 = context.isSingleton("user");
        System.out.println("user1 = " + user1);
    }
请记住如果我们没有配置Scope,那么他默认为singleton

4.3.2 Prototype 原型
Bean 部署的非 singleton prototype scope 导致每次对该特定Bean的请求都会创建一个新的Bean实例。也就是说,该 bean 被注入到另一个 bean 中,或者你通过容器上的 getBean() 方法调用来请求它。作为一项规则,你应该对所有有状态的 bean 使用 prototype scope,对无状态的 bean 使用 singleton scope。

与其他scope相比,Spring并不管理 prototype Bean的完整生命周期。容器对prototype对象进行实例化、配置和其他方面的组装,并将其交给客户端,而对该prototype实例没有进一步的记录。因此,尽管初始化生命周期回调方法在所有对象上被调用,而不考虑scope,但在prototype的情况下,配置的销毁生命周期回调不会被调用。(简单理解如果配置Scope为Prototype ,这该对象不受Spring生命周期的管辖)
     <!-- 3. set注入  -->
    <bean id="user" class="com.shu.pojo.User">
        <property name="name" value="shu"/>
    </bean>

<!-- 3. set注入  -->
    <bean id="user" class="com.shu.pojo.User" scope="prototype">
        <property name="name" value="shu"/>
    </bean>
    @Test
    public void test6(){
        ApplicationContext context = new ClassPathXmlApplicationContext("applicationContext.xml");
        User user = (User) context.getBean("user");
        System.out.println("user = " + user);
        User user2 = (User) context.getBean("user");
        System.out.println("user = " + user2);
        user.show2();
        // 用于判断是否是单例模式
        boolean user1 = context.isSingleton("user");
        System.out.println("user1 = " + user1);
    }
观察结果:


Spring原型bean-prototype不能销毁?
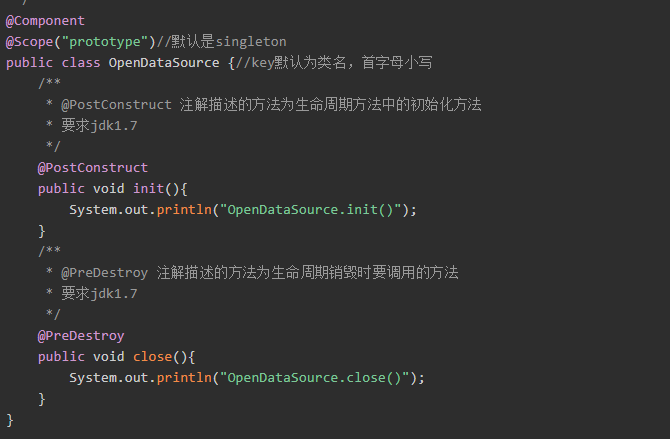
一个原型bean的例子:
结果是 注解的@PreDestroy的方法close()没有执行,而如果是单例bean 的singleton则会执行
那若想销毁Spring的原型bean应该怎么办呢?
最佳答案
只要原型bean本身不持有对另一个资源(如数据库连接或会话对象)的引用,只要删除了对该对象的所有引用或对象超出范围,就会立即收集垃圾.因此,通常没有必要显式销毁原型bean,(其实官方文档也说了的)

/**
* Bean PostProcessor that handles destruction of prototype beans
*/
@Component
public class DestroyPrototypeBeansPostProcessor implements BeanPostProcessor, BeanFactoryAware, DisposableBean {

    private BeanFactory beanFactory;

    private final List<Object> prototypeBeans = new LinkedList<>();

    @Override
    public Object postProcessBeforeInitialization(Object bean, String beanName) throws BeansException {
        return bean;
    }

    @Override
    public Object postProcessAfterInitialization(Object bean, String beanName) throws BeansException {
        if (beanFactory.isPrototype(beanName)) {
            synchronized (prototypeBeans) {
                prototypeBeans.add(bean);
            }
        }
        return bean;
    }

    @Override
    public void setBeanFactory(BeanFactory beanFactory) throws BeansException {
        this.beanFactory = beanFactory;
    }

    @Override
    public void destroy() throws Exception {
        synchronized (prototypeBeans) {
            for (Object bean : prototypeBeans) {
                if (bean instanceof DisposableBean) {
                    DisposableBean disposable = (DisposableBean)bean;
                    try {
                        disposable.destroy();
                    } catch (Exception e) {
                        e.printStackTrace();
                    }
                }
            }
            prototypeBeans.clear();
        }
    }
}
request、session、application 和 websocket scope只有在你使用Web感知的Spring ApplicationContext 实现(如 XmlWebApplicationContext)时才可用。后面补充
总结:

